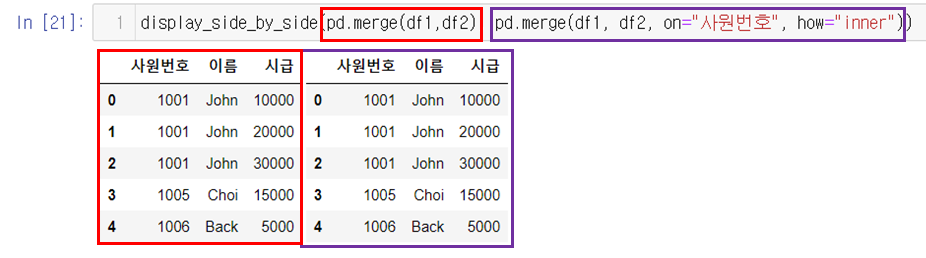
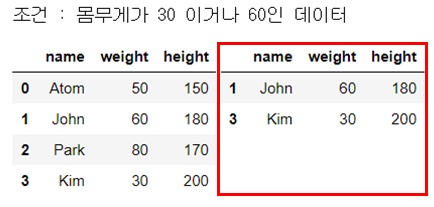
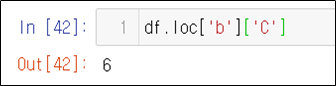
str_expr = "weight in [60,30]" # 같은 결과 "weight == [60,30]"
people_df_q = people_df.query(str_expr) # 조건 부합 데이터 추출
print("조건 : 몸무게가 30 이거나 60인 데이터")
display_side_by_side(people_df, people_df_q)
5) not in 연산자( not in, !=)
not in 과 != 의 결과는 같다
다수의 조건데이터는 리스트[] 또는 튜플() 형태로 사용가능
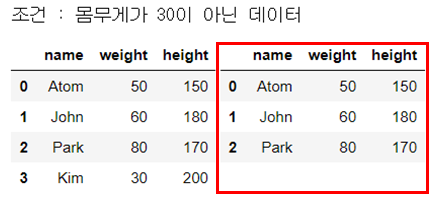
str_expr = "weight != 30" # 같은 결과 "weight not in 30"
people_df_q = people_df.query(str_expr) # 조건 부합 데이터 추출
print("조건 : 몸무게가 30이 아닌 데이터")
display_side_by_side(people_df, people_df_q)
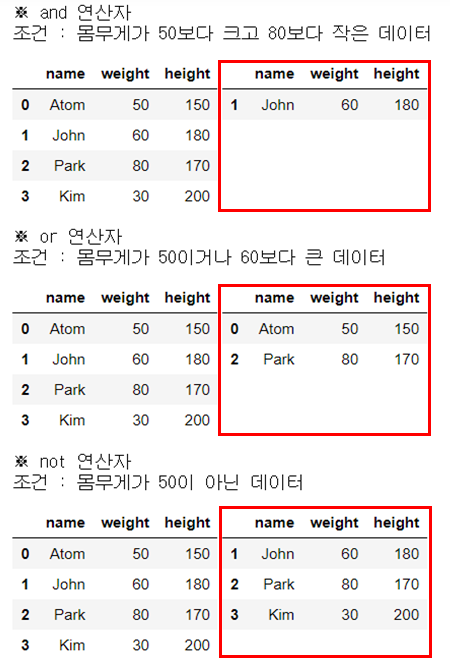
6) 논리 연산자(and, or, not)
and : 전체 조건이 참일경우 참
or : 전체 조건 중 하나라도 참일경우 참
not : 뒤에 오는 조건의 반대(참일경우 거짓, 거짓일경우 참)
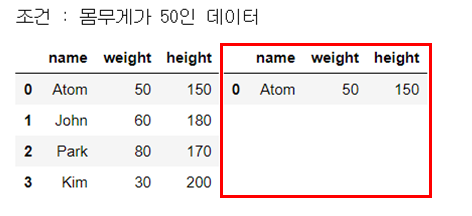
str_expr = "(weight > 50) and (weight <80)"
people_df_q = people_df.query(str_expr) # 조건 부합 데이터 추출
print("※ and 연산자")
print("조건 : 몸무게가 50보다 크고 80보다 작은 데이터")
display_side_by_side(people_df, people_df_q)
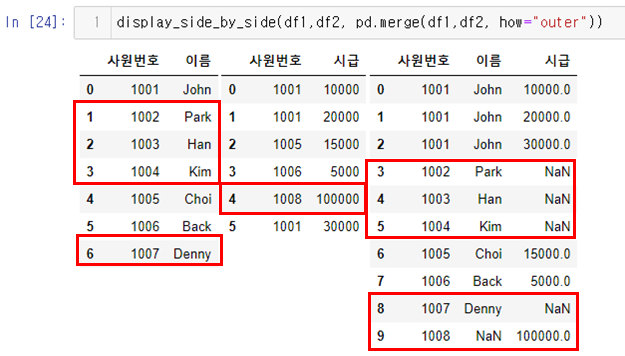
str_expr = "(weight == 50) or (weight > 60)"
print("※ or 연산자")
print("조건 : 몸무게가 50이거나 60보다 큰 데이터")
people_df_q = people_df.query(str_expr) # 조건 부합 데이터 추출
display_side_by_side(people_df, people_df_q)
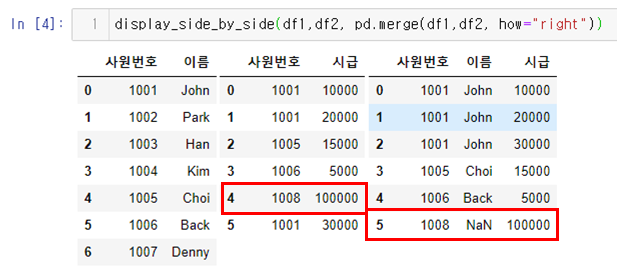
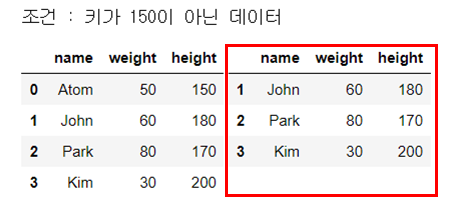
str_expr = "not (weight == 50)"
print("※ not 연산자")
print("조건 : 몸무게가 50이 아닌 데이터")
people_df_q = people_df.query(str_expr) # 조건 부합 데이터 추출
display_side_by_side(people_df, people_df_q)
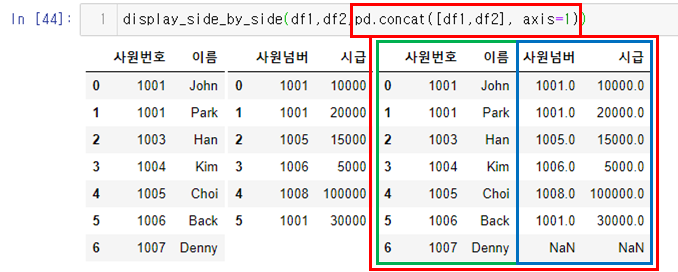
7) 외부 변수 참조 연산
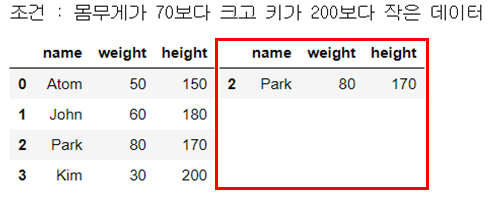
num_weight = 70
num_height = 200
str_expr = "(weight > @num_weight) and (height <= @num_height)"
print("조건 : 몸무게가 70보다 크고 키가 200보다 작은 데이터")
people_df_q = people_df.query(str_expr) # 조건 부합 데이터 추출
display_side_by_side(people_df, people_df_q)
8) f-String을 이용한 외부 변수(또는 함수) 참조 연산
num_weight = 70
num_height = 200
str_expr = f"(weight > {num_weight}) and (height <= {num_height})"
people_df_q = people_df.query(str_expr) # 조건 부합 데이터 추출
print("조건 : 몸무게가 70보다 크고 키가 200보다 작은 데이터")
display_side_by_side(people_df, people_df_q)
9) 함수를 이용한 참조 연산
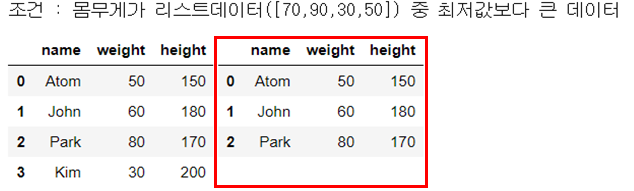
def weight_min(data):
    return min(data)

num_weight = 70
str_expr = "weight > @weight_min([70,90,30,50])" # 몸무게가 30보다 큰 데이터
print("조건 : 몸무게가 리스트데이터([70,90,30,50]) 중 최저값보다 큰 데이터")
people_df_q = people_df.query(str_expr) # 조건 부합 데이터 추출
display_side_by_side(people_df, people_df_q)
10) 인덱스 검색
인덱스이름이 있다면 index대신 이름(DataFrameObj.index.name)을 기입합니다.
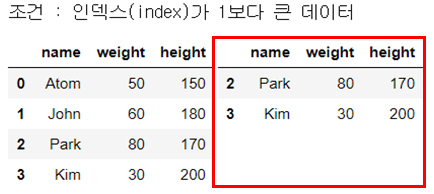
str_expr = "index > 1"
people_df_q = people_df.query(str_expr) # 조건 부합 데이터 추출
print("조건 : 인덱스(index)가 1보다 큰 데이터")
display_side_by_side(people_df, people_df_q)
11) (비교문자열)컬럼명.str.contains
▶ query 함수 옵션
engine : python
▶ contains 함수 옵션
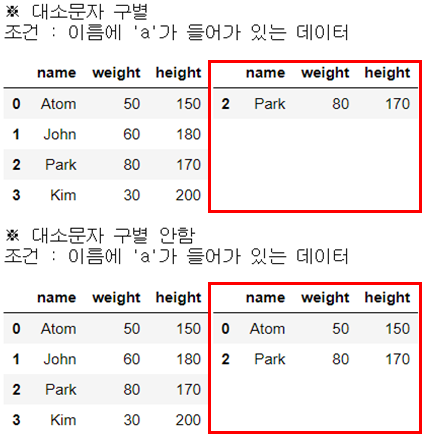
case : True (대소문자 구별, 디폴트), False(대소문자 구별 안함)
str_expr = 'name.str.contains("a")'
people_df_q = people_df.query(str_expr, engine="python") # 조건 부합 데이터 추출
print("※ 대소문자 구별")
print("조건 : 이름에 'a'가 들어가 있는 데이터")
display_side_by_side(people_df, people_df_q)

str_expr = 'name.str.contains("a",case=False)'
people_df_q = people_df.query(str_expr, engine="python") # 조건 부합 데이터 추출
print("※ 대소문자 구별 안함")
print("조건 : 이름에 'a'가 들어가 있는 데이터")
display_side_by_side(people_df, people_df_q)
12) (비교문자열)컬럼명.str.startswith
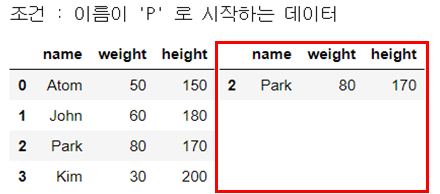
str_expr = 'name.str.startswith("P")'
people_df_q = people_df.query(str_expr, engine="python") # 조건 부합 데이터 추출
print("조건 : 이름이 'P' 로 시작하는 데이터")
display_side_by_side(people_df, people_df_q)
13) (비교문자열)컬럼명.str.endswith
str_expr = 'name.str.endswith("m")'
people_df_q = people_df.query(str_expr, engine="python") # 조건 부합 데이터 추출
print("조건 : 이름이 'm' 로 끝나는 데이터")
display_side_by_side(people_df, people_df_q)